Air-Gapped Root: Why We Intentionally Hid ODAC's Most Powerful Feature

The most dangerous button in any cloud dashboard is the one that grants root access. The ODAC platform was built on the premise of secure defaults, isolating every application inside strictly constrained containers with zero root access. This zero-trust baseline works flawlessly for standard web applications, databases, and microservices. However, when operators need to deploy advanced self-hosted workloads like WireGuard VPNs, eBPF hardware monitoring tools, or specialized network proxies, container isolation becomes the enemy.
Before today, running a workload requiring host access meant stepping outside the ODAC orchestration lifecycle. Operators were forced to manually hack Docker runtimes, cobble together custom systemd services, or bypass the platform entirely. This fragmented the infrastructure and defeated the purpose of a unified control plane. We needed a way to grant elevated host permissions without compromising the rigorous security model of the cloud dashboard.
Enter App Privileged Mode. We are introducing the odac app privileged command to the local ODAC agent CLI, giving operators full control to elevate specific applications directly from the host machine.
The Architecture of Intentional Friction
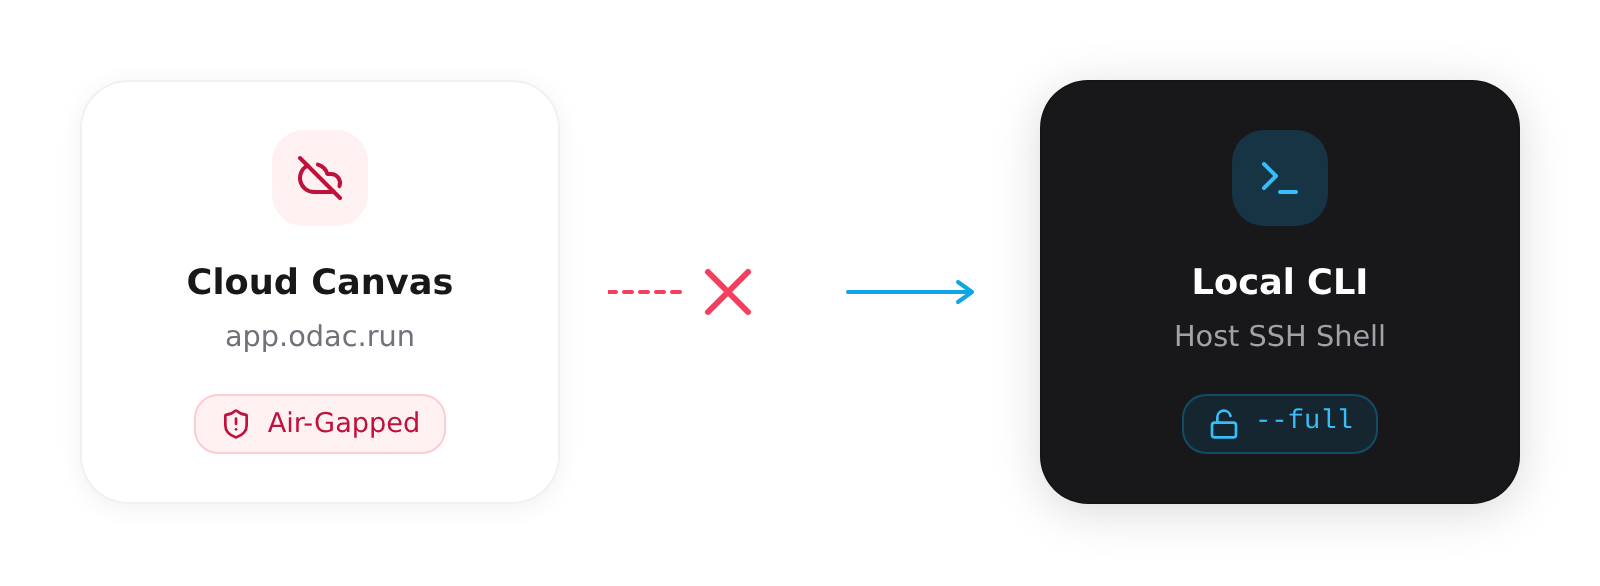
The most important architectural decision behind App Privileged Mode is what we did not build. If you log into the ODAC Cloud Canvas at app.odac.run, you will not find a toggle switch for privileged access. This omission is not a missing feature: it is a deliberate security boundary.
By keeping this command exclusive to the local CLI API and explicitly omitting it from the Hub class, we guarantee that privileged mode cannot be activated remotely. This intentional air-gap protects your infrastructure from remote privilege escalation. If an attacker somehow compromises your ODAC Cloud account, they still cannot grant themselves root access on your bare metal servers. You must be authenticated locally via SSH to unlock the vault.
Two Levels of Elevation
Under the hood, we implemented two distinct levels of elevation managed via the App.setPrivileged() internal state and applied during the container creation phase.
Root Execution Only (--root)
This mode runs the container process as the root user without granting full Docker privileged capabilities. It is perfect for applications that need to bind to privileged ports below 1024 or modify specific internal routing tables, while still retaining standard cgroup and namespace isolation.
Full Hardware Access (--full)
This flag drops the hammer. It enables full Docker Privileged mode, bypassing standard container isolation entirely. Your application gains broad access to host devices, raw sockets, and system calls. This should be strictly reserved for highly trusted applications like VPN gateways or kernel-level packet analyzers.
Deploying a Privileged Workload
Managing elevated workloads remains seamlessly integrated into your existing ODAC workflows. Simply SSH into the server hosting your ODAC agent and identify your target application using odac app list.
Once you have identified the target, you can elevate its permissions using the local CLI interface:
# Grant root execution only
odac app privileged my-monitoring-app --root

# Grant full Docker privileged mode
odac app privileged my-vpn-app --full

# Revoke elevated privileges and return to isolation
odac app privileged my-vpn-app --off
Upon execution, the CLI presents an interactive prompt to confirm the security implications. Once confirmed, the ODAC platform safely tears down the existing container and rebuilds it with its newly granted capabilities. Your advanced workloads are now fully managed, monitored, and orchestrated by ODAC, while your cloud boundary remains perfectly intact.